paint-brush
Making My IoT Security Camera System on Renderby@mastrolinux
1,455 reads
1,455 reads

Making My IoT Security Camera System on Render

by Luca CiprianiAugust 12th, 2022
Read on Terminal Reader
Read this story w/o Javascript
tldt arrow

Too Long; Didn't Read

How To Create Your Own Security Camera System With Raspberry Pi, Picamera2, Flask, and Render. In doing so, we’ll understand the fundamentals of IoT and potentially evolve this into a fully-fledged product. In this article, we will walk through how to create a smart camera control system to secure your room. We'll cover the whole system and how to get it running: Hardware assembly, software (camera client, dashboard UI client, and server) Server deployment (Raspberry Pi)

Companies Mentioned

Mention Thumbnail
Mention Thumbnail
featured image - Making My IoT Security Camera System on Render
Luca Cipriani HackerNoon profile picture

How To Create Your Own Security Camera System With Raspberry Pi, Picamera2, Flask, and Render


Most of the smart camera control systems available on the market are black boxes that we put in our homes. We don’t really know what’s going on inside them or how they’re updated. While there might be some reliable vendors, we want to explore how to create our own smart camera control system. In doing so, we’ll understand the fundamentals of IoT and potentially evolve this into a fully-fledged product.


In this article, we will walk through how to create a smart camera control system to secure your room. We’ll cover the whole system and how to get it running:


  • Hardware assembly
  • Software (camera client, dashboard UI client, and server)
  • Server deployment


Before we dive in, let’s give a brief overview of today’s IoT landscape.


The IoT Landscape

Just to get a sense of some typical business uses, let’s take a look at some example applications of IoT technologies.

Healthcare, Manufacturing, and Retail

These three fields all have great applications for IoT, and they are technologically quite similar. In these fields, IoT devices are typically used to track equipment and customer interactions with items being sold or that are key to providing specific services.


This can be as complicated as an insulin regulation device regularly sending data about a patient or as simple as an Apple AirTag sending the position of a device to prevent theft. At the end of the day, the applications aren’t much different: a small, internet-connected device, that sends some data payload based on observations it has made about the world around it.

Logistics and Transportation

In the logistics and transportation fields, the goal is to make shipping and transport more efficient, cost-effective, and faster. IoT device usage centers around tracking the shipment of goods or automating a warehouse. Some clear examples include warehouse drones or robots, or a GPS tracker for trucks.


Smart cities, Construction, and Manufacturing

Using IoT devices to better understand how people move in a city or interact with a building are some of the more advanced uses of this type of technology. Power companies may install IoT devices to report on peak electricity usage times per household. Cities may install IoT devices on traffic lights to determine better traffic flows or even adjust the timing of lights on the fly. A waste disposal company may put IoT trackers in garbage bins to understand how many people are using publicly accessible trash cans, to better place them and increase their usage.


Of course, there are many other applications. Today IoT is a normal part of our daily lives, even if we are not fully aware of how much it is used in the world.


IoT used to be complex. For professional applications, IoT continues to be complex, mainly because of the following reasons:


  • Hardware: There are different groups of capable hardware, with the most common being microcontrollers, nodes, gateways, and protocol servers.

  • Radio protocols: There are many of them, including WiFi, BLe, LoRaWAN, and SigFox.

  • Over-the-air (OTA) update process: This is complex, but it is something you want to have if you are deploying thousands of devices in the field.

  • Data visualization: Gathering a lot of data is useless if we cannot present it to our users.

  • Security


However, IoT does not need to be complex, and there are tools that can simplify the development of basic applications. We can quickly create prototypes and to better understand possible solutions. And with the right amount of effort, we can solve some real-life problems.


Fortunately, very capable hardware is now cheaper than ever, and many modern IoT and SaaS companies have started simplifying the development and deployment of web applications, saving us time while also ensuring they are always available, simple to recreate, and require little to no maintenance costs.


In the hardware area, products like Arduino, NodeMCU, and Raspberry Pi have made getting started with IoT a process that no longer takes weeks or months but now can take just a matter of days.


Similarly, in the software field, companies like Amazon AWS, Google Cloud, Render, and Rancher have made the deployment of an IoT application an easy and fun process!


Now that we’ve laid down the fundamentals, let’s dive into our project.

Creating a Smart Camera Control to Secure your Room

We’ll create a smart camera control system to secure any room in your house in a few steps:


  1. The system takes a picture every time a motion is detected, for which we’ll use a motion detection module.
  2. The picture is saved on a remote server.
  3. Through a dashboard accessing the server, you can look at all the events, including the photo and a timestamp.
  4. We’ll save the last 500 events and clean up all the older ones.


The high-level architecture

Below is a graphic that provides the general, high-level architecture of our entire system:
What components will we need?

Hardware

  • We’ll need a Raspberry Pi 4, a motion detection sensor, and a camera module, plus some more small hardware items available in the full Bill of Materials (BOM) below.


Software

  • A Render.com account to deploy the server used for saving and showing the camera pictures.
  • Git, python3, and a code editor.


Product

Link

Price

Raspberry Pi 4 Model B - 4GB

https://www.raspberrypi.com/products/raspberry-pi-4-model-b/?variant=raspberry-pi-4-model-b-4gb

$55.00

Raspberry Pi Camera Module 2

https://www.raspberrypi.com/products/camera-module-v2/

$29.95

Micro SD 16GB

https://www.amazon.com/Sandisk-Ultra-Micro-UHS-I-Adapter/dp/B073K14CVB

$12.91

Raspberry Pi 12.5W Micro USB Power Supply

https://www.raspberrypi.com/products/micro-usb-power-supply/

$8.00

HC-SR501 PIR Infrared Sensor

https://www.amazon.com/HiLetgo-HC-SR501-Infrared-Sensor-Arduino/dp/B07KZW86YR

$7.89

Jumper Wires

https://www.amazon.com/Elegoo-EL-CP-004-Multicolored-Breadboard-arduino/dp/B01EV70C78

$7.98


The total cost of the hardware is around $120. The application should work with Raspberry Pi models with less RAM, which could save $20 or more. However, I did not test those models.

Configuring the Raspberry Pi

Step 1: Plug in your Raspberry Pi with a reliable power source. It’s best to use the official one indicated in the BOM. There was news of some old Raspberry Pi 4 models having issues with some USB-C cables and power supply configurations.


Step 2: Then, install the Raspberry Pi OS. The best guide and tools are available on the official site of Raspberry Pi OS. Please follow that guide if you do not have an OS already on your Raspberry Pi. You will use the SD card during this step.


Because this application does not require a graphical interface, you could install the Raspberry Pi OS Lite version (for experts only). However, if this is the first time you are developing with a Raspberry Pi, you’ll probably be happier if you pick the Raspberry Pi OS with the desktop (64-bit) version.

Assembling the PIR Motion Sensor

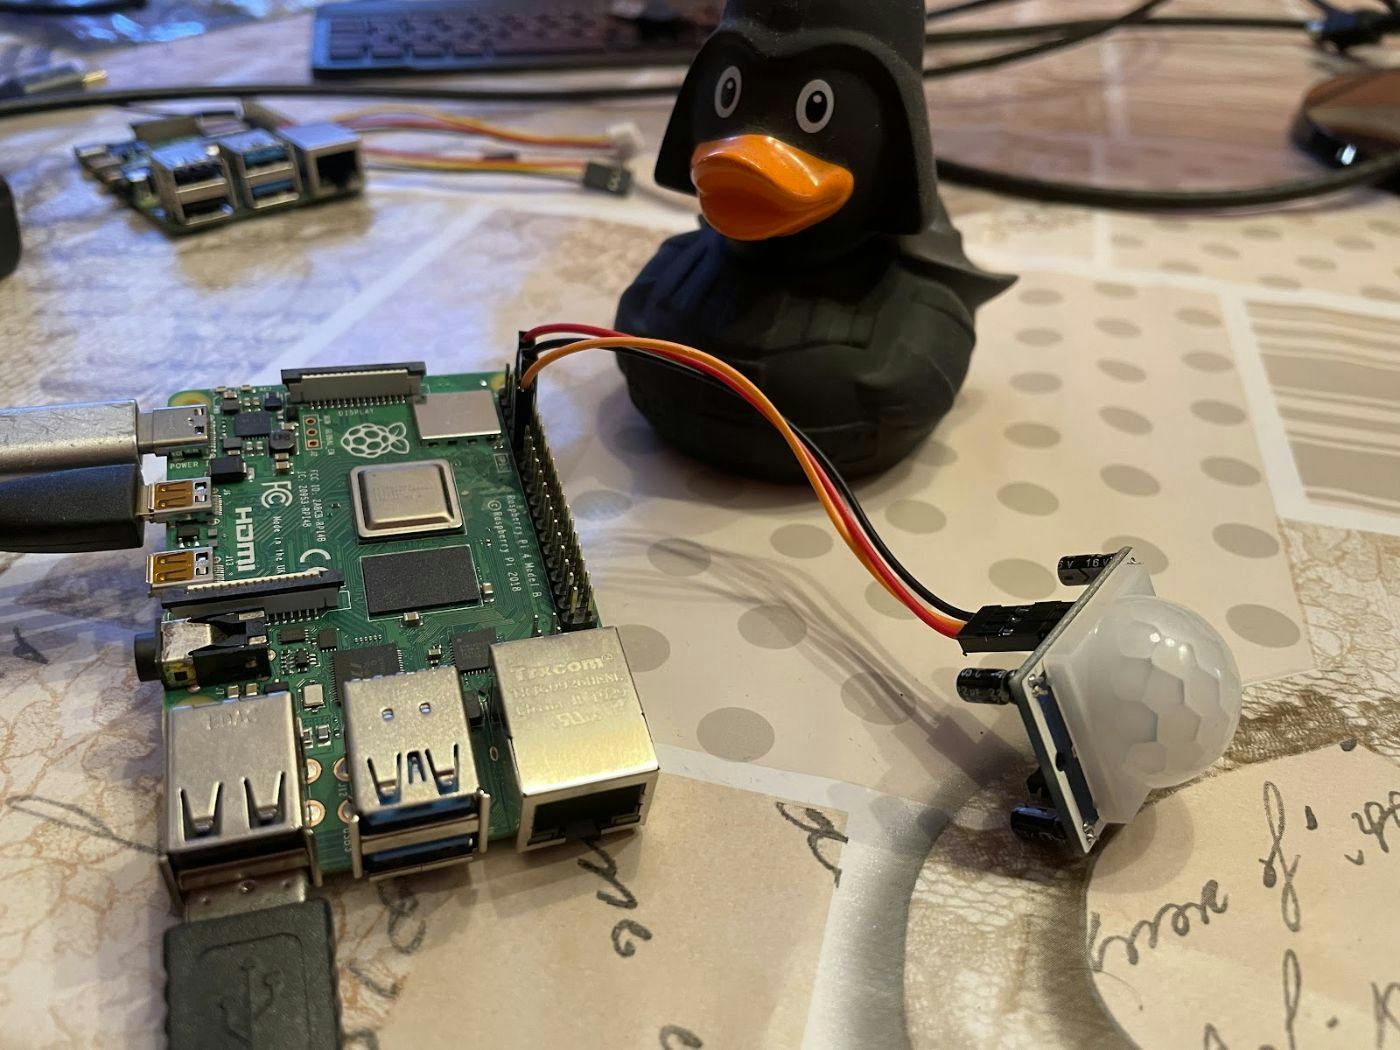
Step 3: Next, we want to test the PIR Motion Sensor to detect movement in our room.

The sensor has three wires, two of them are for the power (+5V and ground), and the third one is for reading the value from the sensor. For our purposes, we will read 1 if the sensor detects a movement, and 0 otherwise.


It is easy to see the pinout of our Raspberry by using the pinout command. For a full explanation of every pin, you can take a look at Pinout.xyz.


In our case, we want to use a black wire to connect the ground of the sensor to the ground of our board (PIN 6), a red wire to the +5V (PIN 2), and the signal wire to one of the GPIO (PIN 11).


Here are two pictures of how to assemble it:


Some more information is available on Projects | PIR Sensor | Raspberry Pi. If you do not know which cable is which, please remove the cap over the sensor, and check the label on the PCB.

Detecting a movement

To detect a movement, we will need some piece of software that reads the values from the PIR and notifies us. A simple version of such an application is available in Python on GitHub.


from gpiozero import MotionSensor
from datetime import datetime
from signal import pause

pir = MotionSensor(17)

def capture():
    timestamp = datetime.now().isoformat()
    print('%s Detected movement' % timestamp)

def not_moving():
    timestamp = datetime.now().isoformat()
    print('%s All clear' % timestamp)

pir.when_motion = capture
pir.when_no_motion = not_moving

pause()


Just to clarify, we pass the value 17 to MotionSensor() because our motion detector is plugged into GPIO17 (even though, on the physical board, this corresponds to pin 11).


To start it, just run python pir_motion_sensor.py. I use it to tune the timing of the PIR.


Indeed, there is a risk the sensor does not notify the system every time it detects a movement because there is an internal timer that prevents the system from continuously sending a movement signal (to avoid triggering an action too often). The timer is configurable using a potentiometer as described in the article Testing a PIR | PIR Motion Sensor | Adafruit Learning System.


The timer has a range of 0-255 seconds (255 is all clockwise, 0 is all counter-clockwise). From my experience, I suggest configuring the timer at about 7-10 seconds, so the potentiometer should be turned counterclockwise at an almost horizontal position. In a similar way, there is a sensitivity potentiometer, on which clockwise means more sensitive.


The output of the command should be something like this:

pi@raspberrypi:~/raspberry-pi-security-camera-client $ python pir_motion_sensor.py 

2022-04-21T15:35:35.275947 Detected movement
2022-04-21T15:35:41.607265 All clear


If you see a difference of about 6-7 seconds, then that’s about right. Otherwise, keep tuning the timing potentiometer until you reach the desired timing.


Adding the camera

The next step is to ensure our camera is correctly assembled. Make sure to assemble it on the right side, or it will not work. Also, be sure to install it with the Raspberry Pi turned off and disconnected from any source of power. This is the best video I have found to walk through this process.

Once done, reboot your Raspberry Pi and ensure you have the new camera stack.

Open a console and type the following:


$ sudo raspi-config


Select the Interface Options menu.


Select Enable/Disable legacy camera support and be sure to disable it.

Finally, save and reboot again.

Picamera2 versus Picamera

Picamera2 is the new python port of libcamera. The old project, Picamera is extremely popular but was based on a different system. You can find more information on Bullseye camera system - Raspberry Pi and the official announcement of Picamera2 on a preview release of the Picamera2 library - Raspberry Pi.

Testing the camera

To test the camera, I created a short script using Picamera2. Picamera2 installation is not trivial, because the project is still under preview. So, I prepared a git repo with all the instructions to install Picamera2 on your Raspberry Pi. You can follow the README.md file and then come back here (I’ll wait!). But, please do not run the main.py script yet. It’s best to verify the camera is set up correctly by running this file first:


$ python example_picamera2.py


The contents of example_picamera2.py are as follows:


from gpiozero import MotionSensor
from picamera2.picamera2 import *
from datetime import datetime
from signal import pause

pir = MotionSensor(17)
camera = Picamera2()
camera.start_preview(Preview.NULL)
config = camera.still_configuration()
camera.configure(config)

def capture():
    camera.start()
    timestamp = datetime.now().isoformat()
    print('%s Detected movement' % timestamp)

    metadata = camera.capture_file('/home/pi/%s.jpg' % timestamp)
    print(metadata)
    camera.stop()

def not_moving():
    timestamp = datetime.now().isoformat()
    print('%s All clear' % timestamp)

pir.when_motion = capture
pir.when_no_motion = not_moving

pause()


This file will take a snapshot every time the movement detection PIR sensor detects motion, and the image will be placed in the /home/pi directory with a name that is equal to the time of when the camera captured the image.


Here is the image my camera took:


If the script works, then congratulations! You are more than halfway through our project, and everything works locally.


But this is still not an IoT project—we are missing the I in IoT! We still need to make the project capable of being monitored remotely. We also need to guard against the situation where someone accesses our Raspberry Pi, removes the SD Card, and walks away with the recorded image documenting the infringement of our property.


Writing the client code and testing locally

We are now ready to complete the client software logic that does the following:

  1. Set up the camera with Picamera2.

  2. Initialize the motion sensor.

  3. When a movement is detected, read the event and call a function that:

    1. Captures an image and saves it to a file on the local filesystem.
    2. Uploads the image to a remote server.
    3. Removes the local file if uploaded correctly, to avoid filling up all the space on the Raspberry Pi.
  4. When motion is no longer detected after a timeout (6-7 seconds in our case), read the event and print the timestamp with an "All clear" message.

  5. Wait for the next event.


This is how the high-level code will look:

def init(settings):
    camera = setup_camera()
    pir = MotionSensor(settings.get('PIR_GPIO'))
    pir.when_motion = picture_when_motion(pir, camera, settings)
    pir.when_no_motion = not_moving
    pause()


The most complex function is picture_when_motion. Usually, when_motion accepts a callback that cannot have any other argument, but reading the documentation carefully shows the following:


when_motion

The function to run when the device changes state from inactive to active.

This can be set to a function that accepts no (mandatory) parameters, or a Python function that accepts a single mandatory parameter (with as many optional parameters as you like).


So I converted it to a function, creating a callback and returning it.


def picture_when_motion(pir, camera, settings):
    setup_path(settings.get('IMG_PATH'))
    def capture_and_upload_picture():
        if camera:
            file_path = capture(camera, settings.get('IMG_PATH'))
            server_settings = settings.get('SERVER')
            uploaded = upload_picture(file_path, server_settings)
            if uploaded:
                cleanup(file_path)
        else:
            print("Camera not defined")
    return capture_and_upload_picture


The capture function is similar to the one we used to test the camera, while the upload_picture function is the one that transforms our software into an IoT application. Let's analyze it together.


def upload_picture(file_path, server_settings):
    if server_settings.get('base_url'):
        url = urljoin(server_settings.get('base_url'), 'upload')
    if server_settings.get('user') and server_settings.get('password'):
        user = server_settings.get('user')
        password = server_settings.get('password')

    files = {'file': open(file_path, 'rb')}
    print('Uploading file %s to URL: %s' %(file_path, url))
    try:
        r = requests.post(url, files=files, auth=HTTPBasicAuth(user, password))
        image_path = r.json().get('path')
    except e:
        print(e)
    if not image_path or not r.ok:
        print('Error uploading image')
        return False
    print('Image available at: {}'.format(image_path))
    return True


Ideally, I was imagining a server that would accept a file as a payload of a POST request, and that server should be authenticated with username and password. We can imagine we could make a call like this:


curl \
  -F "file=@/home/user/Desktop/test.jpg" \
  http://localhost:5000/upload


I wrote a client to provide this experience and it is available here. Feel free to copy it, as it has been released with the open source MIT license. The file we’ve been discussing is the one named main.py, and you can execute it by running python main.py. However, the execution will fail until we will set up a server to store our images. Let’s do that now.


Creating a server to store our images

We can now leave our hardware on a table and start working on the server. I had some basic requirements in mind to keep it simple to understand, decently secure, and extremely easy to deploy. Fortunately, I recently learned about Render, and that saved me a lot of time. I did not want to create my own online server and have to take care of all the security updates, nor spend too much money on such a simple server.


I had the following requirements for a server:


  • Support for python code, specifically Flask: I am used to Python, and I wanted to use the same software on the client and the server.
  • No RDBMS or complex database: the filesystem is enough to store images.
  • A REST interface for some simple APIs:
    • /upload to upload images.
    • / to get a list of all the images.
    • /cleanup to remove old images.
    • /download/<name> to download a single image.
  • A secure TLS connection (HTTPS).
  • Some kind of authentication, both for my Raspberry Pi to upload the files, and for myself to check them.
  • Automatic deployment
  • Support for secure environment variables, for storing user credentials.
  • Low cost (no more than a few dollars/month).


The code and all the instructions to run the server locally or on your own server are available on Github, but here I will describe how to run it remotely on a hosting service you do not need to maintain.

The Flask application

Flask is a simple and flexible Python Framework for quickly creating web applications (and mostly used for REST API) The main code is in the main.py file, but let's analyze it step by step.


First, I initialized the Flask application and declared that I want to use the basic authentication method.

The first function I declared is named setup, and it only reads some environment variables available on the local machine. I usually create a .env file with all the environment variables.


Then I declared a verify_password function to verify if the password provided to the server is the correct one.


Next, we have the most important function of the whole server: the one that supports uploading new files and storing them on the filesystem. The function is named upload_file and will be accessible using the /upload endpoint. This function has been modified from the original one found on the official Flask documentation page.


def upload_file():
    # You can test with CURL:
    # curl \
    #   -F "file=@/home/user/Desktop/test.jpg" \
    #   http://localhost:5000/upload
    
    if request.method == 'POST':
        # check if the post request has the file part
        if 'file' not in request.files:
            flash('No file part')
            return redirect(request.url)
        file = request.files['file']
        # If the user does not select a file, the browser submits an
        # empty file without a filename.
        if file.filename == '':
            flash('No selected file')
            return redirect(request.url)
        if file and allowed_file(file.filename):
            filename = secure_filename(file.filename)
            file.save(os.path.join(app.config['UPLOAD_FOLDER'], filename))
            return jsonify(success=True, filename=filename, path=urljoin(request.host_url, url_for('download_file', name=filename)))
    return '''
    <!doctype html>
    <title>Upload new File</title>
    <h1>Upload new File</h1>
    <form method=post enctype=multipart/form-data>
      <input type=file name=file>
      <input type=submit value=Upload>
    </form>
    '''


The function works both in GET and POST mode. While running in POST, we can upload a file from a text client or another application. In GET mode, we can use the browser.


Testing locally

You can test the server directly in the Raspberry Pi 4, but if you have a Linux or Mac machine, then it is really easy to configure and start it. Please note we are using python3, and the configuration is a bit more complex on Windows machines and not covered in this tutorial.


To test the application locally, we first need to create a .env file and put it in the same directory as the application. The .env file will store some information needed by the server.


  • A secret key for managing Flask sessions
  • The upload folder where to save the images
  • The maximum size accepted for an image
  • The username and password for authentication
  • The endpoint URL of the server itself


Here is the .env-example-local file you can use as a template, copying and renaming as .env. Please change the values according to your needs.


SECRET_KEY='change-this-to-something-unlikely-to-guess'
UPLOAD_FOLDER = './img'
MAX_CONTENT_LENGTH = 16000000
USERNAME = 'admin'
PASSWORD = 'change-this-to-your-unique-password'
SERVER='http://127.0.0.0:5001/'


Then you can run python main.py, which will start the server with active debugging, so we can see what is happening behind the scenes.


$ python main.py
 * Serving Flask app 'main' (lazy loading)
 * Environment: production
   WARNING: This is a development server. Do not use it in a production deployment.
   Use a production WSGI server instead.
 * Debug mode: on
 * Running on all addresses (0.0.0.0)
   WARNING: This is a development server. Do not use it in a production deployment.
 * Running on http://127.0.0.1:5001
 * Running on http://192.168.123.228:5001 (Press CTRL+C to quit)
 * Restarting with stat
 * Debugger is active!
 * Debugger PIN: 332-932-829


The first thing we can do is to test uploading a file. I prefer doing it with CURL, but if you like something more visual, you can use Postman or similar tools. Let's imagine you want to upload an image from the path /Users/luca/Pictures/image.jpeg then you can use the following command:


curl \
   -F "file=@/Users/luca/Pictures/image.jpeg" \
   -u 'admin:password' \
   'http://127.0.0.1:5001/upload' 
{
  "filename": "image.jpeg", 
  "path": "http://127.0.0.1:5001/download/image.jpeg", 
  "success": true
}


The reply tells us the request to upload the image was successful. We can see the image at the URL: http://127.0.0.1:5001/download/image.jpeg. You can now CTRL+Click or CMD+Click on it to see if you are able to see the image.


Deploying the server to Render

Now that we have a working server, it is time to push it to a real, stable, and secure environment. In the past I have set up my own server on Amazon AWS EC2, and that has often proven effective, but it also comes with a lot of maintenance costs on my side: the frequent need to update the OS, install security patches, and make a ton of configuration changes (generating and rotating HTTPS/TLS certificates, setting a load balancer or a static IP address, configuring DNS, and so on).


I’ve also used Heroku in the past as a great way of deploying simple services with zero maintenance. (You can see my previous article on How to Build a Robust IoT Prototype In Less Than a Day [Part 2].) But in this case, I had some extra requirements that Heroku could not satisfy:


  • We need persistent disk storage to save the pictures, and I did not want to configure a database.
  • Cronjobs, to avoid retaining too many images in our server, I want to run an API to keep only the last 20 images in a periodic way. This is why I created a /cleanup endpoint and I want to call it once a week to ensure there are no more than 20 images stored on the server.
  • Simple file-based .env secrets and variables

Sign up and configure the first service

Before signing up on the platform, I encourage you to fork my GitHub repo by clicking the "fork" button on the top right of the screen.


Now, you can go to https://render.com and sign up with Github.


Then select New Web Service from the dashboard.

Next, search for the recently forked repo.

Once selected, it is time to configure our server. You can select the free plan for now, but we will need a persistent disk immediately after, so it’s best if you choose the starter plan.

The parameters to use are the following:


  • Name: free choice

  • Environment: Python3

  • Region: pick the one closest to you

  • Branch: main

  • Build command pip install -r requirements.txt

  • Start command gunicorn main:app


Now go to the advanced section in the interface and set up a secret file. You can name it .env and paste the following text (changing it with your own values):

Save your changes. The application will still fail to deploy because we are missing a disk. Let’s create one now.


Creating a persistent disk

We need to store our images somewhere. Of course, we could store some metadata in a database, and the files on the filesystem, but due to the simplicity of our server, a filesystem is enough.

Creating a persistent disk on Render is trivial and can be done using the interface. Just click on the disk section on the left, select a name for it, and a mount path. Here are my values:


  • Name: images
  • Mount path: /var/img
  • Size: 1GB


Once there, we can deploy our application again with a Manual Deploy. We will be notified about its status in the "Events" tab.


And if we click on a specific event, we get all the details.


Once successful, you will get the server URL at the top of the page. In my case, I claimed https://camera-server.onrender.com. Feel free to check out my deployment at https://camera-server.onrender.com/sitemap (since Render servers are protected from DDoS attacks too!)

Now, it’s time to start uploading some real pictures from our Raspberry Pi client!


The first thing to change is the file .env in our raspberry client. You’ll want your environment variables to look like this:


PIR_GPIO=17
USERNAME='admin'
PASSWORD='change-me-with-a-real-password-please'
API_SERVER='https://your-api-address.onrender.com/'
IMG_PATH='img'


Then, start the https://github.com/mastrolinux/raspberry-pi-security-camera-client service with python3 main.py


If you move in the field of the PIR sensor, the camera will take a picture and will upload it to the server. We should get back the URL of the image so we can download it through a browser. If that works, then well done! We’re almost there.

Periodically cleaning images (via Cronjobs)

Because I personally do not want to store too many images on the server, I decided to keep 500 at most. However, rather than deleting them automatically as soon as they reach 500, I decided to perform a cleanup every week, ensuring that I store the correct images in case someone is caught by the security camera. For this, I created an additional service—a Cronjob—to periodically call a well-formed API for such use cases.


I created a server route named /cleanup that calls the keep_last_images() function. The function is defined as follows:


@app.route('/cleanup/', methods = ['POST'])
@auth.login_required
def keep_last_images():
    ## You can test with curl
    # curl -v -d '{"keep": "20"}' -H "Content-Type: application/json" -u 'username:password' -X POST http://127.0.0.1:5001/cleanup/
    # Remove the last number of files sent in the POST request
    if request.method == 'POST':
        try:
            jsonrequest = request.get_json()
            files_to_keep = int(jsonrequest.get('keep', 500))
        except:
            files_to_keep = 500

        files = get_list_of_img_path(path=app.config['UPLOAD_FOLDER'], reverse=True)
        # Keep the last X files
        removed_files = cleanup(files, keep=int(files_to_keep))
        # Masquerade the server path to the user
        removed_files = [os.path.basename(path) for path in removed_files]
        return jsonify(removed_files=removed_files, files_available=len(files), success=True)
    return jsonify(success=False), 400


This function sorts the images by most recently created, and keeps the X amount of images indicated in the POST request payload. To test it with CURL, do the following:


$ curl -v -d '{"keep": "20"}' -H "Content-Type: application/json" -u 'username:password' -X POST http://127.0.0.1:5001/cleanup/


In this way, we will clean up all the images older than the first 20. Now, we need to call our function periodically. I decided to run it once a week, but you might choose a different frequency to meet your needs.


In the Render dashboard, I created a new Cronjob service. The nice thing about these is that you only pay for the second of execution. In our case, we will end up paying at most $1/month.


Here are my settings for the Cronjob:


  • Name: Cleanup older files
  • Region: Frankfurt Schedule: 4 5 * * 2 (I use https://crontab.guru/ to create the correct string.)
  • Command: python3 auto_cleanup.py 20 (The last parameter is the number of images you want to keep.)
  • Build command: pip install -r requirements.txt (This is needed to install all the dependencies.)
  • Branch: main
  • Auto-deploy: yes
  • Cronjob Failure Notifications: User account notification settings


You can manually trigger a run on a Cronjob without waiting for the right schedule, so we can test it immediately, just click the "Trigger Run" button at the top of the page.


At this point, this is how your dashboard should look:


Creating a minimal dashboard of events

With such a simple server setup, the only thing we need to do for displaying the images in order is to query the filesystem and list the files by creation date. This logic is described in the list_files() function.


# List endpoint, get an HTML page listing all the uploaded files link
@app.route('/')
@auth.login_required
def list_files():
    files = get_list_of_img_path(path=app.config['UPLOAD_FOLDER'], reverse=True)
    images_url = []
    for file in files:
        images_url.append(urljoin(request.host_url, url_for('download_file', name=os.path.basename(file))))

    return render_template('imglist.html', images_url=images_url)


This function calls OS-related APIs and returns a list of files ordered by creation. Then, it returns the data to the imglist.html file, using jinja templating. The essential part of the file is:


 <ul>
          {% for image in images_url %}
            <li><a href="{{image}}">{{image}}</a></li>
            {% else %}
              <li>No images uploaded yet</li>
          {% endfor %}
 </ul>


Now, a request to https://your-api-endpoint.onrender.com/ yields the following list:


Looking at your dashboard when you are abroad

The power of IoT is not just about storing remotely images to keep them more secure or avoiding the loss of data if someone steals or damages your Raspberry Pi.


The real power comes from looking at your data from anywhere in the world. Because we have a full internet-accessible URL from Render, we can take a look at our photos no matter where we are, and we can even do some from our mobile device. We just need to log in with the username and password that was put in the .env file of the server.


In the last image, my wife is testing if the camera works—and it does! So cool!

Conclusion

In this article we walked through how to create a real mid-level IoT project from end to end—from the hardware setup to the server deployment. We used some popular and inexpensive technologies, including:


  • Raspberry Pi 4
  • Python
  • Flask
  • Render


You can build a fully functional security camera with remote image upload in just a few hours. Enjoy, and let me know how you modified the project to make it even better!


Also Published Here